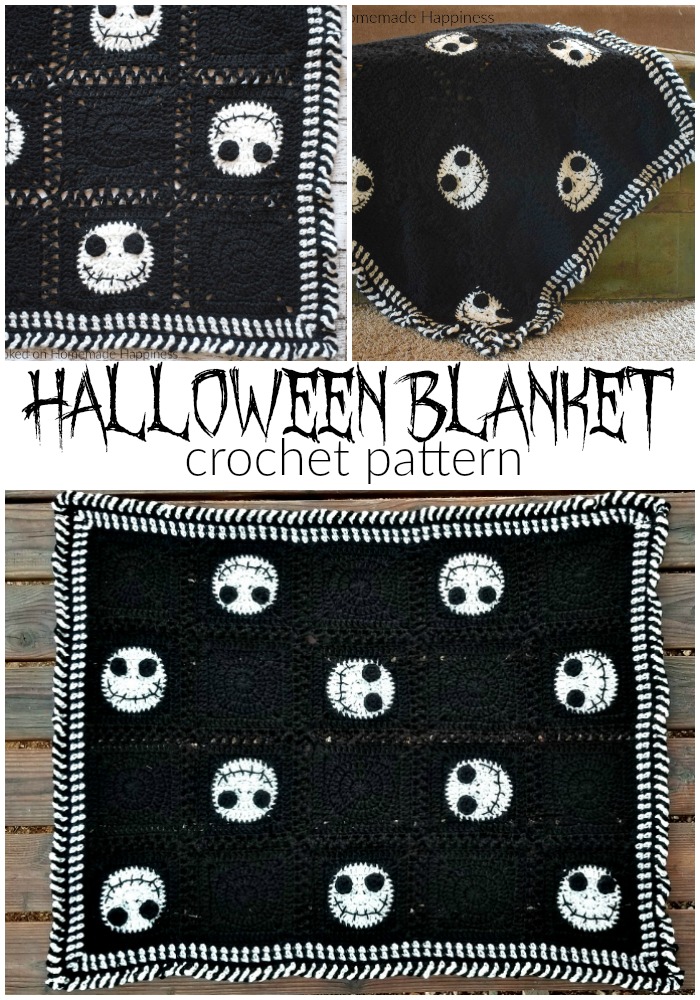
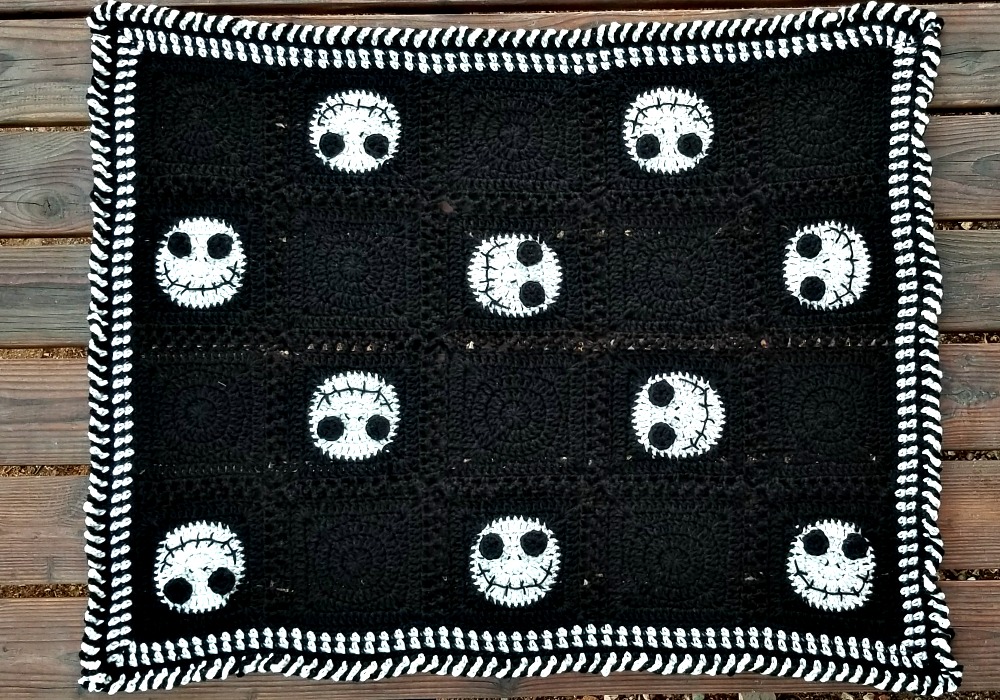
Have some Halloween fun with this Halloween Crochet Blanket! It’s the perfect size to wrap up in while watching your favorite Halloween movie! Because it’s seasonal, I didn’t make this blanket very large. It’s more of a lap blanket. The perfect size for the kids! But it can be made in any size by simply adding more squares.
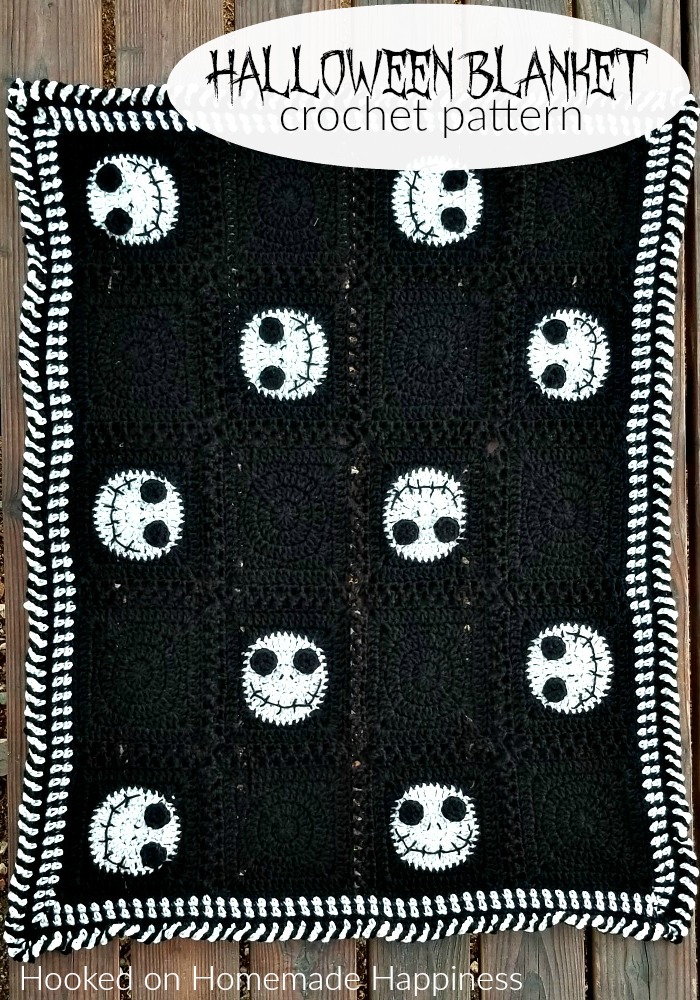
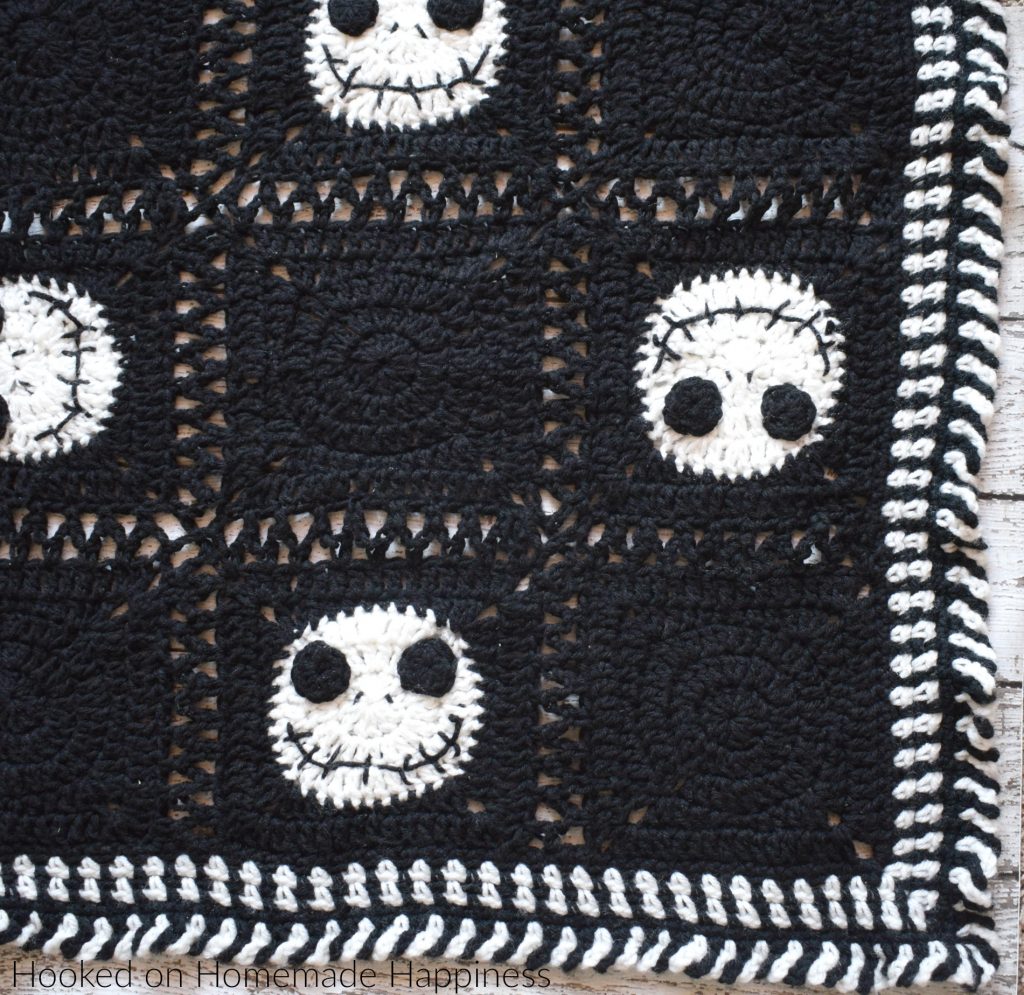
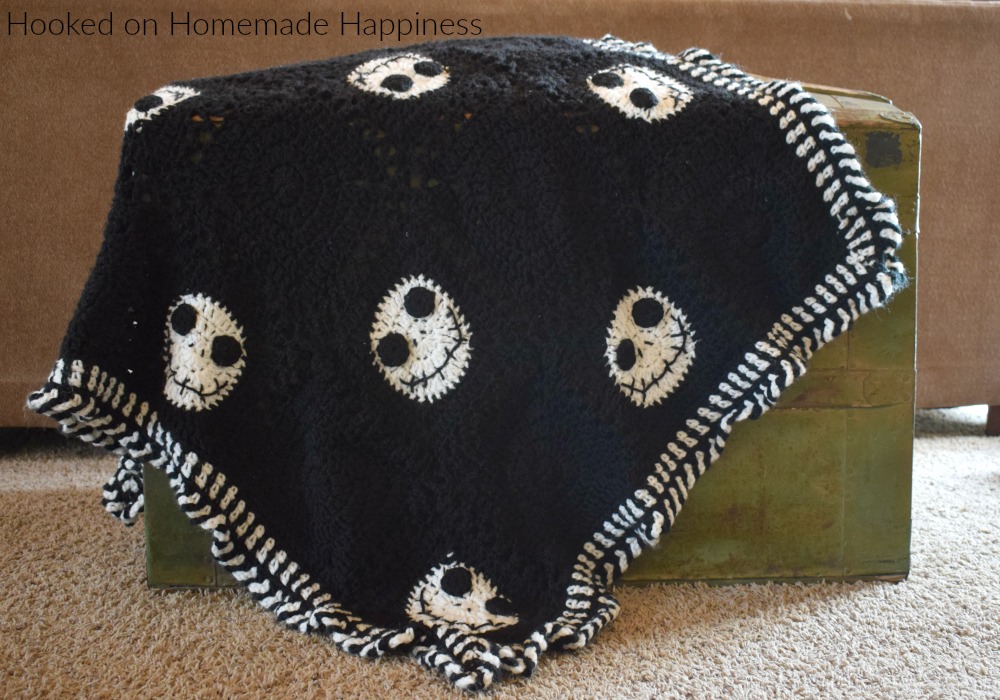
Halloween Crochet Blanket
– Get the free pattern below or purchase the ad-free, printable PDF in my Etsy Shop
– PIN for later HERE
Materials
3 skeins Red Heart Super Saver in black and 2 in Soft White
6.0 mm hook
Scissors
Yarn Needle
Level
Intermediate
Pattern notes & stitches to know
Sl st – slip stitch
Ch – chain
Sc – single crochet
Hdc – half double crochet
Dc – double crochet
Magic ring
**Ch at the beginning of each round counts as a stitch**
Finished Size
36 x 45 inches
GRANNY SQUARES
(make 10 with white and black and 10 solid black)
FOR A DETAILED PHOTO TUTORIAL OF A CIRCLE GRANNY SQUARE CLICK >>HERE<<
Make a magic ring with white (for the 10 faces, the other 10 are solid black with no color changes)
Round 1: 11 dc into ring, pull ring closed tight, join to top of first ch 3 with sl st (12 dc)
Round 2: ch 3, dc into same stitch, 2 dc into each stitch around, join to top of first ch 3 with sl st (24 dc)
Round 3: ch 3, 2 dc in next stitch, *dc, 2 dc in next* repeat from * to * around, stop before last yarn over in last stitch, pull a loop of black, join to top of first ch 3 with sl st (36 dc)
Round 4: ch 3, (dc, ch 2, 2 dc) all in same stitch, dc in next, hdc in next 2, sc in next 2, hdc in next 2, dc in next, *(2 dc, ch 2, 2 dc) all in next, dc in next, hdc in next 2, sc in next 2, hdc in next 2, dc in next* repeat from * to * around, join to top of first ch 3 with sl st (48 crochet stitches, 4 ch 2 spaces)
Round 5: ch 3, dc in next, *(2 dc, ch 2, 2 dc) in ch 2 space, dc in next 12 stitches* repeat from * to * around, join to top of first ch 3 with sl st (64 dc)
Fasten off, weave in the ends.
EYES
Make 20
In Black make a magic ring
Round 1: ch 2, 10 hdc into ring, join to first hdc with sl st
Fasten off, weave in one end, leave the other for sewing.
Attach eyes to the white and black squares. Weave in all your ends.
FACE
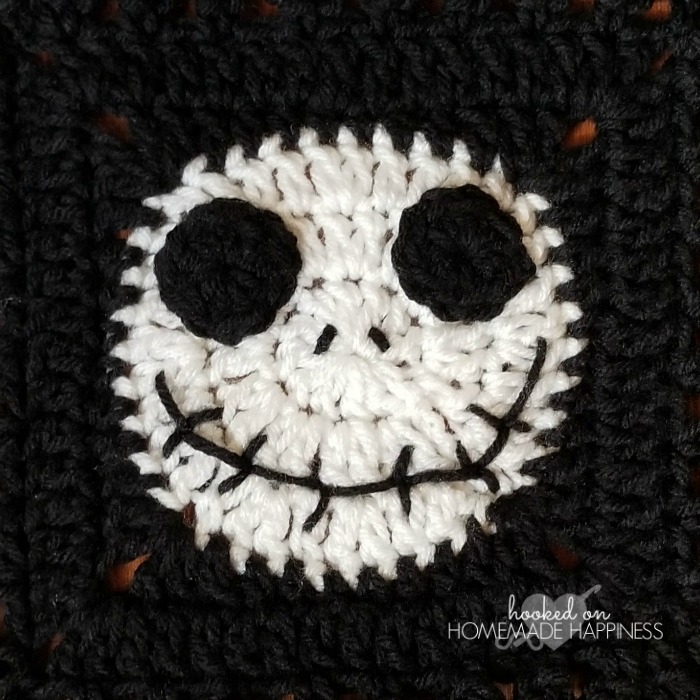
Using a long piece of black yarn and your yarn needle, embroider the nostrils, fasten off, weave in the ends.
Using a long piece of black yarn and your yarn needle, embroider the mouth, fasten off, weave in the ends.
TIP: I found that making the mouth slightly uneven looked much better than a symmetrical mouth
Each finished square measures approximately 7 inches after being wet blocked.
CONSTRUCTION
Arrange your finished squares to your liking. I wanted my Jack Skellingtons all facing different directions.
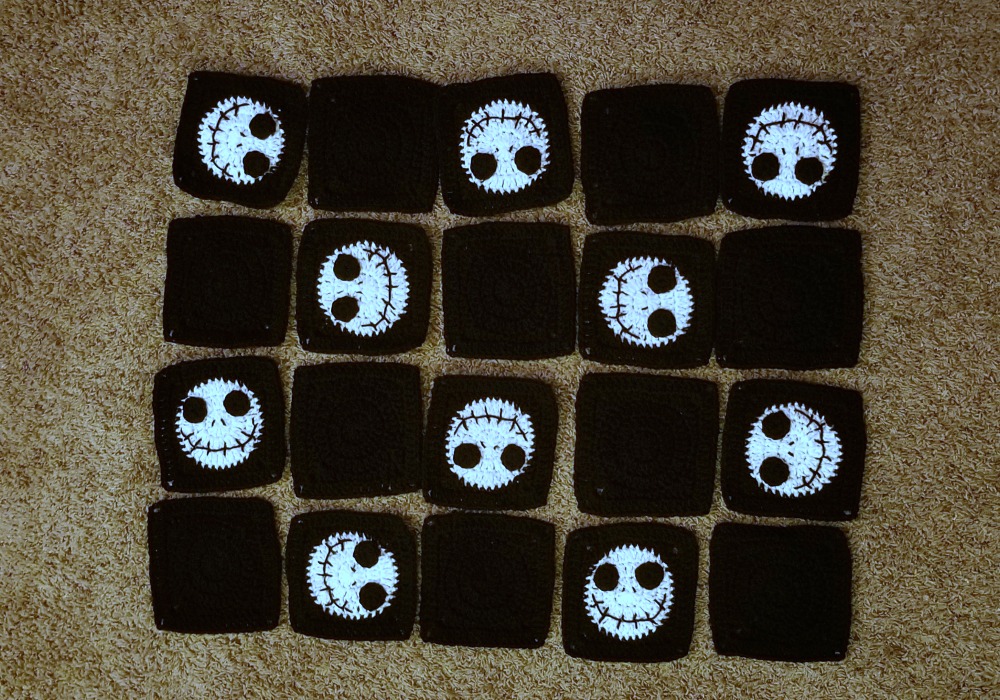
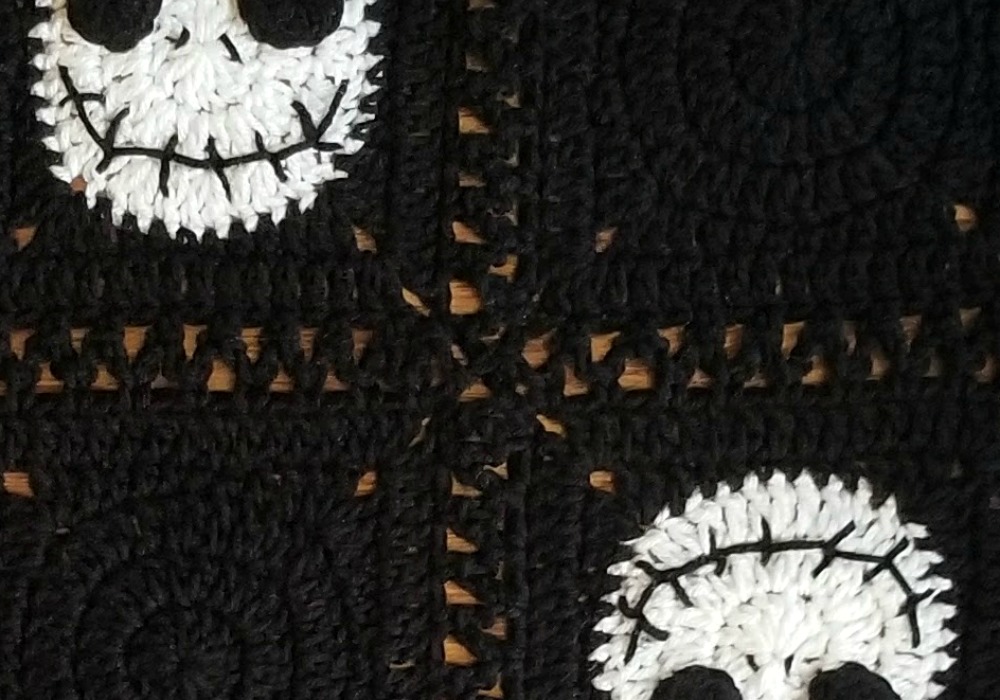
You’re going to join all rows horizontally, then vertically, fastening off after each row. Weave in all your ends. (pattern and photo tutorial below)

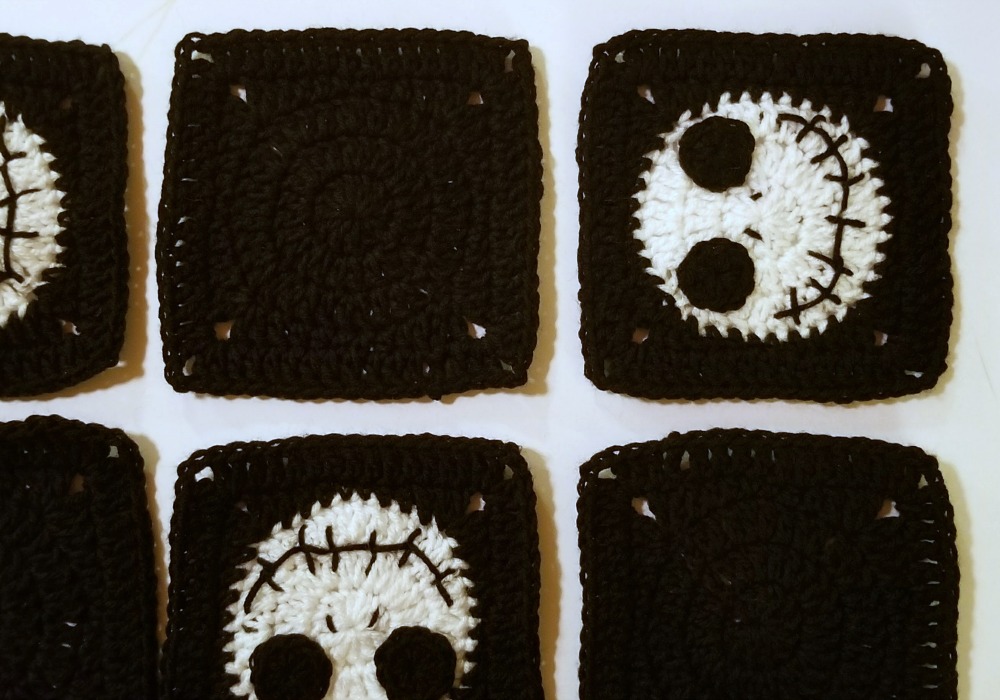
Line up the first two squares to join, insert hook in the chain next to the first dc in the bottom square, sc
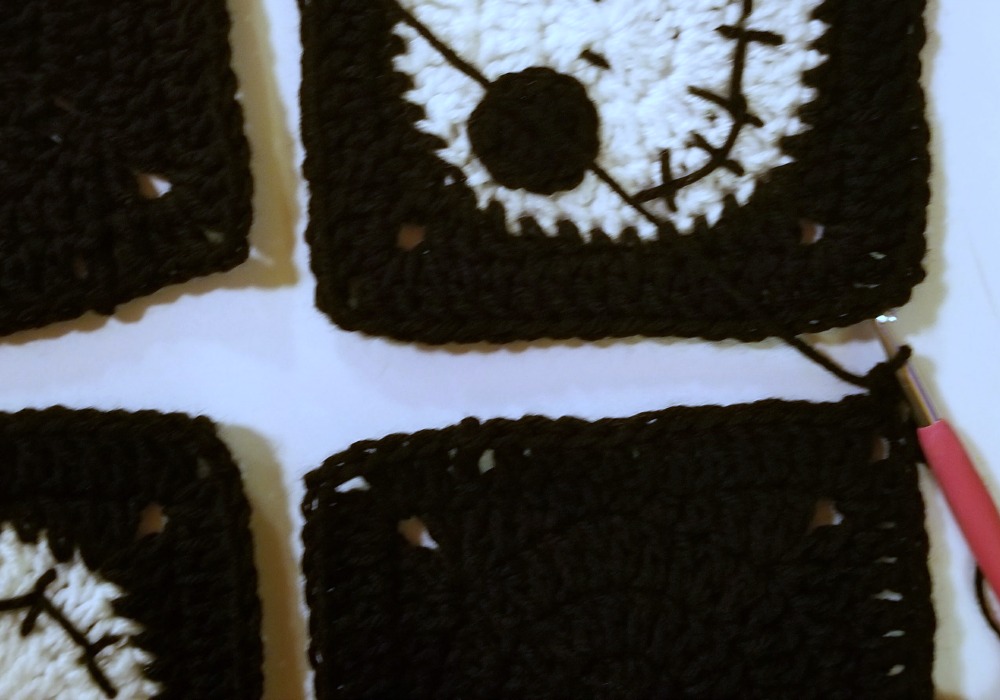
Ch 2, join to the same corner in square above with a sc
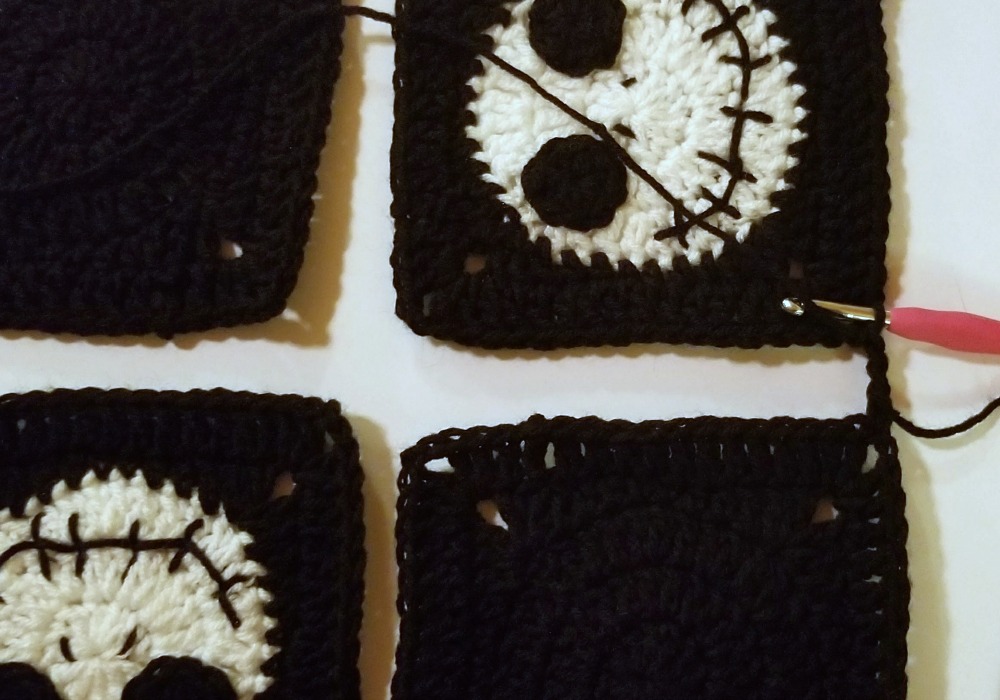
Ch 2, skip one stitch on the bottom, and join with a sc in the next
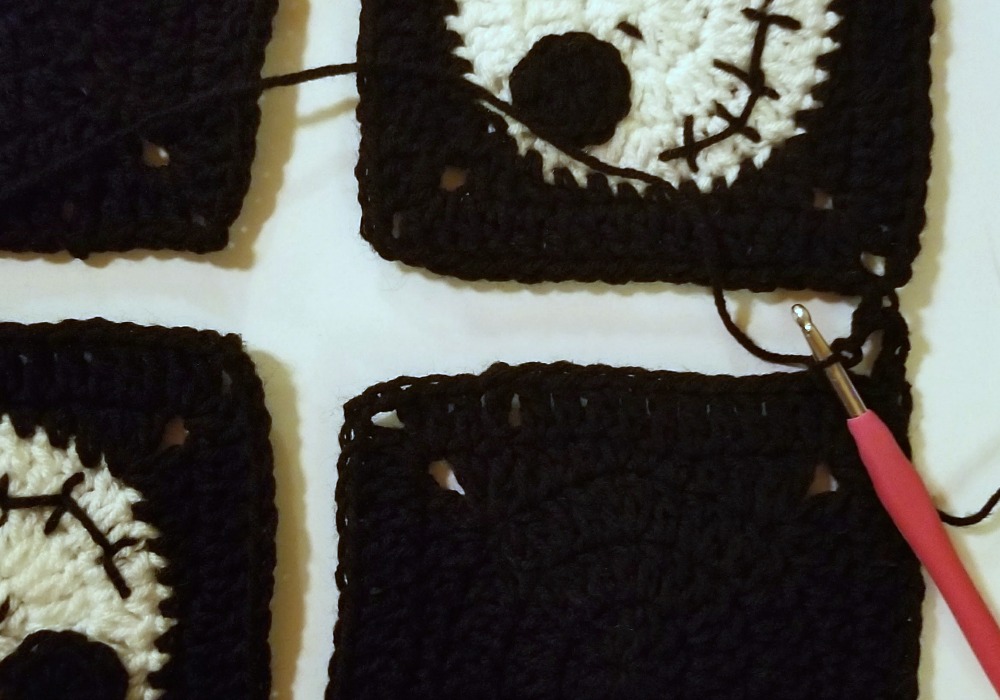
Ch 2, skip one stitch on the top, and join with a sc in the next
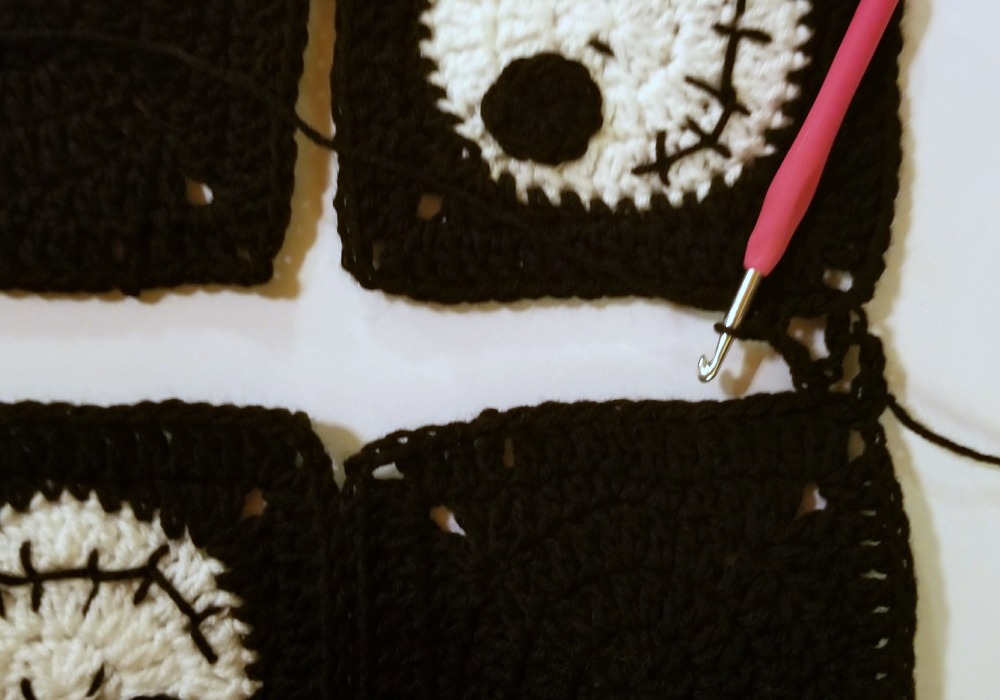
Continue across
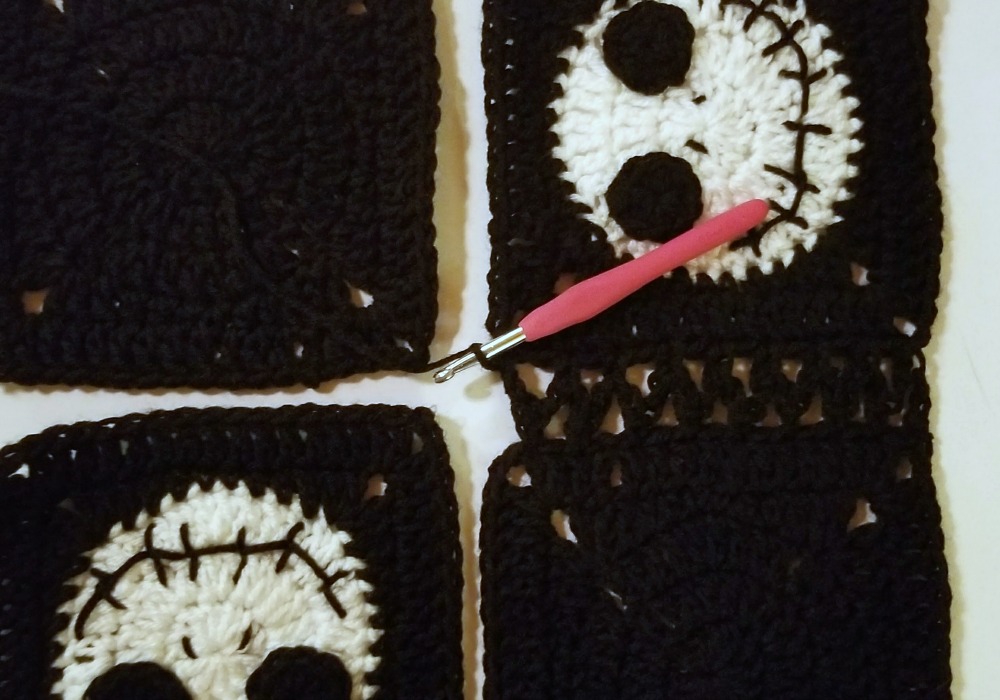
Ch 2, sc in the chain next to the first dc on next bottom square
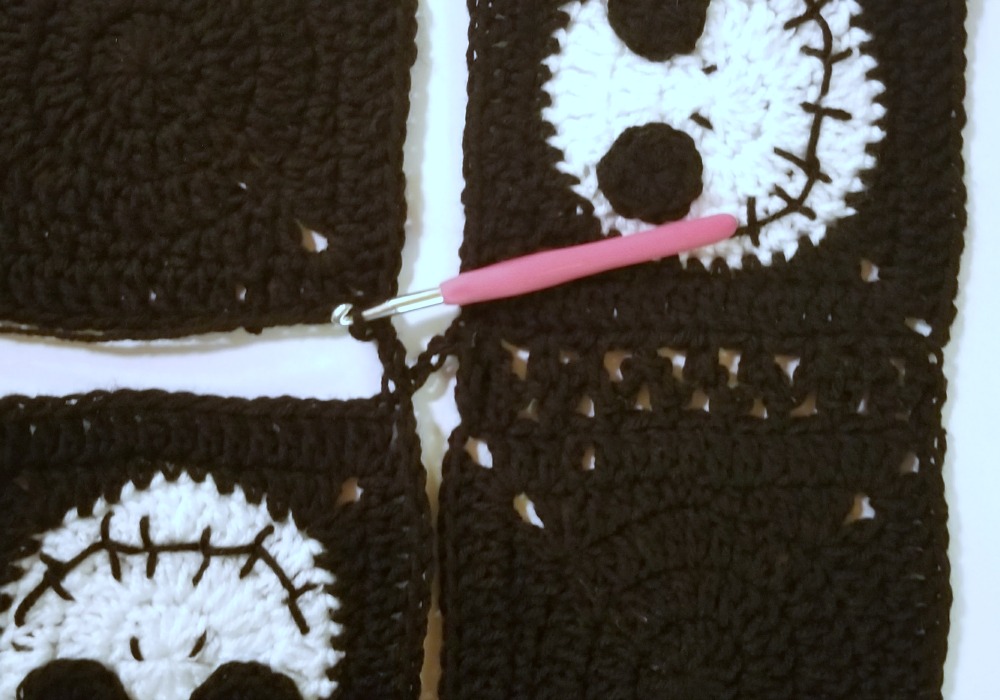
Continue with pattern in each row horizontally and then vertically. Weave in all the ends
BORDER
In Black, join in any corner ch 2 space
Round 1: ch 1, (sc, ch 2, 2 sc) in ch 2 space, sc in each stitch around, working (2 sc, ch 2, 2 sc) in each corner ch 2 space, join to first ch 1 with sl st
Join white in any ch 2 space
Round 2: ch 3 (counts as sc + ch 2), sc in same space, [*ch 1, skip one stitch, sc in next* repeat from * to * to next corner, work (sc, ch 2, sc) in ch 2 space] repeat from [ to ] around, join to first ch with sl st
Join black in any ch 2 space
Round 3: ch 3 (counts as sc + ch 2), sc in same space, [*ch 1, skip sc, sc in ch 1 space* repeat from * to * to next corner, work (sc, ch 2, sc) in ch 2 space] repeat from [ to ] around, join to first ch with sl st
Join white in any ch 2 space
Round 4: ch 3 (counts as sc + ch 2), sc in same space, [*ch 1, skip sc, sc in ch 1 space* repeat from * to * to next corner, work (sc, ch 2, sc) in ch 2 space] repeat from [ to ] around, join to first ch with sl st
Join black in any ch 2 space
Round 5: ch 3 (counts as sc + ch 2), sc in same space, [*ch 1, skip sc, sc in ch 1 space* repeat from * to * to next corner, work (sc, ch 2, sc) in ch 2 space] repeat from [ to ] around, join to first ch with sl st
Round 6: ch 1, sc in same stitch *(2 sc, ch 2, 2 sc) in ch 2 space, sc in each sc and ch across to ch 2 space* repeat from * to * around, join to first ch with sl st
Fasten off, weave in the ends.
Starting at any point along the edge of your project, attach black and ch 4, pull hook out of black, attach white yarn to the next stitch, ch 4, pull hook out of white and back in black. With black sc in the stitch next to the white (overlapping the white) ch 4. Put hook in white, sc in the stitch next to the black (overlapping the black), ch 4
(This is a great photo + video tutorial: http://www.repeatcrafterme.com/2017/08/crochet-candy-cane-border.html)
Repeat across, with 4 stitches in each corner.
When reaching the end, if your colors don’t line up, just skip a stitch
Fasten off, weave in the ends.
Looking for more patterns? Follow me on Facebook, Instagram, and Pinterest! Please share a pic of your finished product with me. I’d love to see it!




Lovethis blanket wish you had a YouTube tutorial
Thank you! I don’t really have the equipment for videos at the moment 🙂
I see that many comments are from 2017. I fell upon your free pattern 2020 because i was looking for Jack Skellington for my granddaughter who loves him! Thank you for sharing this patrern!!! I would love to share the picture with you. Your instructions were wonderful. I also added a pompom border to your existing one, my granddaughter will love it!
Thanks again very much. 🎃 Nancy
Yay! I’m glad you like it! Thank you!!
What does the back of blanket look like how do add the face with out a bunch mess on back
Hi! Mine is a little messy on the back from the sewing. Maria’s Blue Crayon has a tutorial for sewing so it doesn’t show on the back 🙂
https://mariasbluecrayon.com/2018/06/how-to-sew-appliques-onto-croche.html
Can you show a pucture of your pompom border plz?1
I made this blanket for my brother. I used your pattern but added a few more squares. I did make one big one for the center and put the others around. Thanks so much! Everyone loves it.
Awesome!! Thank you so much!
this link has so many ads I couldn’t watch it. Literally, the ads just took over and every time the ad came on it switched the video to another one.
Having ads on my website is how I make an income. Sorry if you have to scroll a bit to get your FREE pattern.
Thank you so much for making this pattern free I was able to make my 2 yr old smile when making this personal blanket for him.
Yay! That’s awesome!! Thank you so much 🙂
I’m in love, it’s beautiful! Thank you for sharing your work!
Thank YOU for your kind words 🙂 <3
Agreed! I switched the joining yarn from black to white and just love the blanket overall. Have a feeling the blanket will be a big hit!
I just love your Halloween Crochet Blanket I’m going to try to crochet it for my boyfriend as he likes the color black and it cot my attention thank you ??
Is this up on Ravelry?
No, not yet! It will be 🙂
This is absolutely wonderful. I love he way you joined the squares! I’m going to use this technique in the future!
Cannot wait to try this blanket out next! ?
This is absolutely wonderful. I love the way you joined the squares! I’m going to use this technique in the future!
Cannot wait to try this blanket out next! ?
Thank you so much!!
I love this but I am having an issue when I get to “Continue with pattern in each row horizontally and then vertically” I finished the horizontal join all squares but when trying to connect the vertical to the horizontal (join all squares) where they meet in between each square it doesn’t look right to me and the photo above isn’t clear enough for me to figure out how you attached the vertical join squares attachment to the horizontal at that spot (in your photo just above the word BORDER). Is there some way for the join all squares connections at that point to be explained for me to make it look correct like yours does but I can’t figure it out? I appreciate any help you can give me with this as I am making for my grand daughter who loves all and everything pertaining to Jack Skellington.
Hi Sandie, I worked the vertical stitches over the horizontal ones (I didn’t attach them to the horizontal stitches). If they’re not crossing in between the squares (making a kind of ‘X’), can you try starting at the other end to work the vertical rows? I hope that makes sense and helps 🙂
I was wondering if I said you were the owner of the pattern with a copy of the link…if you would OK if I made this blanket and donated it to an austion or aood it… Just asking.
Of course! ?
I cannot for the life of me figure out how to do the nose and mouth. Do you have a video tutorial on it or know of a video tutorial that would be similar?
Hi! Sorry, I don’t have a video.
For the Granny square part I think there may be an error on row 5 for it to have 12 stitches on the final row where it connects. I may be doing something wrong but for it to work for me i have to do ch 3, then dc in the next two stitches before I start the corner stitches.
Hello 🙂 are you counting your ch 3 as a dc?
I am
I do not understand round 6 of the border, the part where is says ch across to chain 2 space. I do not understand what that means.
in the border part and on round 6, I do not understand when it says ch acrosse to ch 2 space. Can you please explain that to me.
Hi Heather 🙂 You’re going to sc across the entire side. Work a sc in each sc and ch from the previous row all the way across to the other corner. Does that make sense?
no I guess not. like one side is sc and then when you get to the corner just chain all the way across?? still doesnt make a lot of sense. sorry.
No worries! There isn’t any chaining across. Work the corner stitches, sc in each sc and ch to the next ch 2 space, and repeat.
let me make sure i understand right. so start at the corner like normal, sc in each chain and sc, and work the corners like the others?
Yes ?
oh thank you!!!
Hello,
I was wondering if you could explain to me how you made the face without it showing on the back. I’m struggling with making the nostrils so that you don’t see black stitches on the back of the face. Thanks. ?
Hi ? I didn’t. You can see the stitches in the back. I weaved all the ends in as best I could, but there is a definite “back” to this blanket.
Great! Thanks! ☺️
I am making this blanket for my grandson and I did the sewing of the faces on and was able to make it where you couldn’t really tell it from the back. I am on the joining together part now but can’t wait to see it finished! Thank you for the pattern!
hi this is amazing .. hubby has put an order in for one! just wondered the red super saver balls of yarn you use what size balls please? thanks x
Thank you!! I used 7oz skeins ?
This needs a printer friendly version. 🙂
I have PDF’s available on Etsy and Ravelry 🙂
My daughter, a huge Jack Skellington fan, just sent me this link, saying Mommmmmmm, look!!!!!! Lol….I know what my next project is!!!! We love this! Thank you so much for sharing!
Thank you! 😀
Hi thank you soo much for this pattern love it ? Could you help me out with round 1 border please? When we get to the joins of each square how many sc do we do in the join and do we just put 1 sc in the corners of each square and 2sc, ch2,2 sc in the 4 main corners hope you understand what I’m trying to say ? Thanks
Hi! Yes, just put 1 sc in the corners of each square. You don’t want to have any increases along the side. The (2 sc, ch 2, 2 sc) is just for the 4 main corners. Hope this helps!
Hi thank you yes that helped but where we joined each square it is the chain 2 in between each square do we just do 1 sc or 2 ? Wish I could put a pic up to show you what I mean ?
I think put 1 in each ch 2 space along the side. As long as you keep it consistent, it shouldn’t make too much of a difference. 🙂
thank you so much for this !!! I’ve got a couple of loved ones that are anxiously waiting! and I’m just starting. thank you again this is amazing.
Yay!! Thanks 🙂
I’m not even sure how I landed on your site but I’m so happy I did. My sister in law is infatuated with Jack & your blanket is the best one I have seen. I can’t wait to try it. You have great hands in what you do. Many blessings.
Thank you!!
Thank you so much for this pattern!!! I wish I could share my pictures with you of my finished project!!! This pattern is very well written and has been my favorite to make!! I made this for my niece and added colors to it. Thank you so much!!!
Yay! Thank you!! I’m so glad you loved the pattern 🙂
Thank you for this amazing pattern! I just LOVE this! I have quite a few family members who will just go nuts for this! I think I will have to scratch my earlier projects for a few of these. Thank you once again and Happy Holidays!!
Thank you ???
My son is in the military and is in love with the nightmare before Christmas, I have searched and searched for the perfect pattern and this is it ?? thank you so much ♥️♥️ He is going to be so happy ??
Yay! Thank you so much 🙂
I made this in an adult sized afghan 12×16 squares. I also made the face on the front & the back so that it is reverseable! A lot more work, but my daughter in law is a “Nightmare” fanatic & will absolutely love this.
Yay! Thank you 🙂
Hi, so I absolutely LOVE this and plan on making it very soon. I was thinking about making matching coasters so I was wondering, how big are the granny squares? I’m trying to figure out if I need to scale them down or anything. Thanks!
Hi! I think they’re around 5 – 6″
I made this blanket for a baby shower present. To cover the stitches on the backside, I made white circles (like the face) and sewed them on the back. It made the blanket heavier in weight and the backside looks like polka dots. It was a big hit with my nephew and niece-in-law. Thank you for your creativity. The blanket is beautiful.
Awesome!! That’s a great idea!
It would be my first time trying any crochet thing. So, first, wish me good luck. Second, the tutorial is so detailed and helpful. I am excited to stitch this up for my little one. Anyway, thanks for sharing this amazing hack. ?
Let me know if you have any questions!
Thank you for the clear instructions! I can’t believe this is just made of granny squares. 🙂 I know i can do that. I will be diving into this tonight and try to finish it for Halloween. My kids will love it so much.
Yay!! Let me know if you have any questions 🙂
hello! i’m definitely a little confused on the border? are all 6 rows going around; and does skipping each stitch for each color end up filling in??
Hi! Yes, all the rounds go all the way around. You’ll work in the ch stitches for the next rounds so it ends up filling in 🙂
Hi, is this using American crochet terms or british crochet terms?
I’m excited to make this blanket !
US 🙂
Thank you, I am making this for my daughter her Christmas theme is : “ Nightmare before Christmas “ I have a few people that want me to make their family member one and want to pay me for making them but I don’t want to get in any trouble so would I be able to sell one giving you the credit for the pattern?
Hi! No problem 🙂 You can sell items made from my pattern. Thank you!
Round 5 is incorrect. There are 8 “center” stitches flanked by two increase stitches ground round 4 (2 dc in 1 stitch). Your pattern says to continue 12 DC after doing the corner stitch but on the final round it should say 10, assuming that first ch 3 and DC count towards that row. Otherwise the pattern doesn’t add up. I only add this because I had someone reach out to me that your pattern wasn’t adding up and I see others have commented the same. It can be confusing for beginners so I hope this helps someone 💖
Hi! Each side will have 12 stitches after row 4. 2 dc from the corner, dc in next, hdc in next 2, sc in next 2, hdc in next 2, dc in next, then 2 dc from the next corner. There is a photo tutorial here: https://www.hookedonhomemadehappiness.com/crochet-circle-granny-square/
The border in your photo and the link you provide are different than your instructions. Your instructions are just alternating black and white with one color the entire row; your photo seems to be a ch 4 skip then pick up the other color. I can figure out a border, just wondering if you planned updating it for others.
Hi! There are two parts to the border. The first part is using the moss stitch, alternating each row. Then the second part (explained here: Starting at any point along the edge of your project, attach black and ch 4, pull hook out of black, attach white yarn to the next stitch, ch 4, pull hook out of white and back in black. With black sc in the stitch next to the white (overlapping the white) ch 4. Put hook in white, sc in the stitch next to the black (overlapping the black), ch 4″) matches what is linked for a photo tutorial.
Do you have a ‘Sally’ block that I could alternate with ‘Jack’?
Hi!
I love this pattern! Thank you!!
This is my first granny square blanket and I have a question – when do I wet block the squares? Before I sew on the faces? Or after, but before I see the blocks together? I wasn’t sure.
Hi! I would block after sewing the faces 🙂