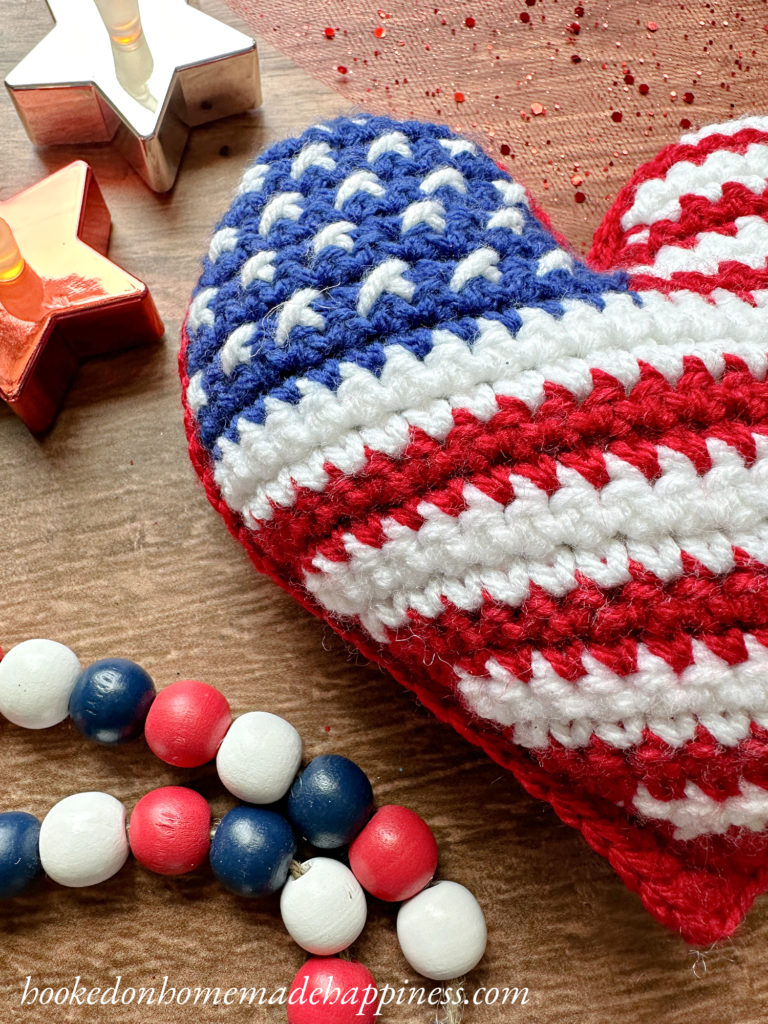
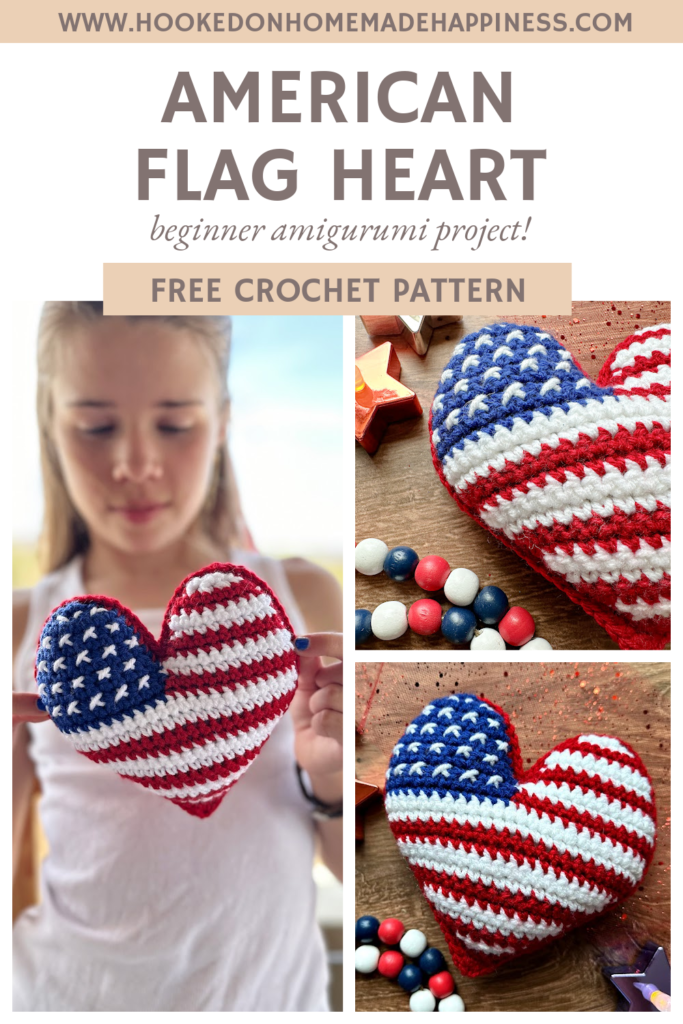
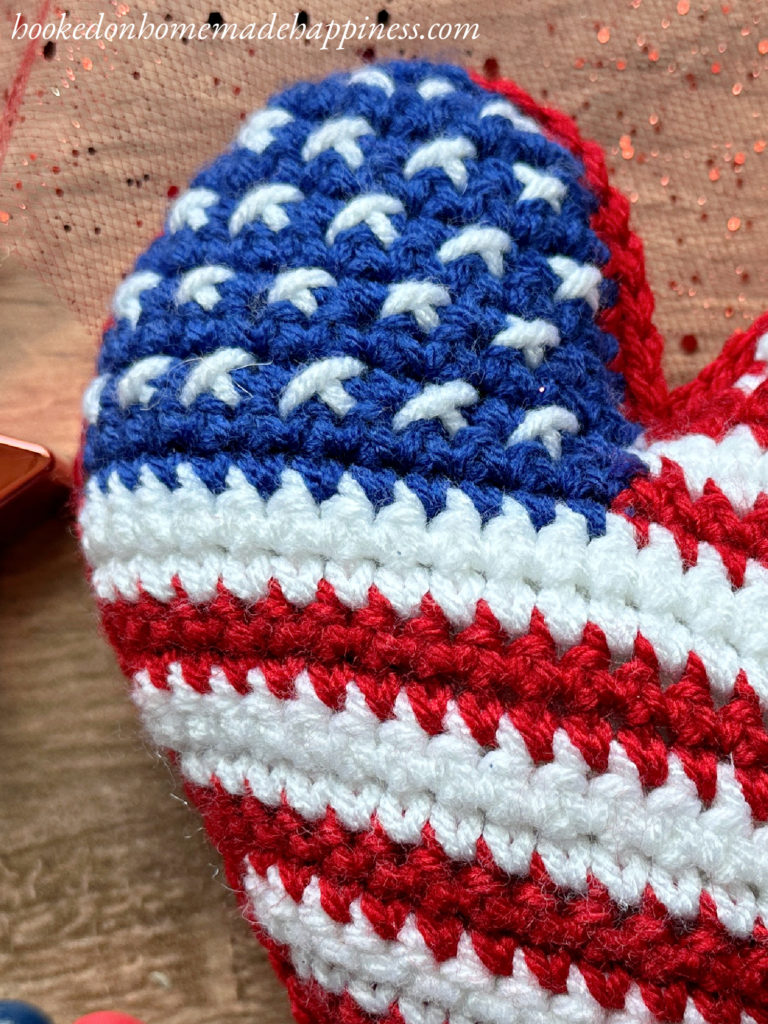
American Flag Heart Crochet Pattern
Celebrate in Crochet Style with This American Flag Heart Pattern
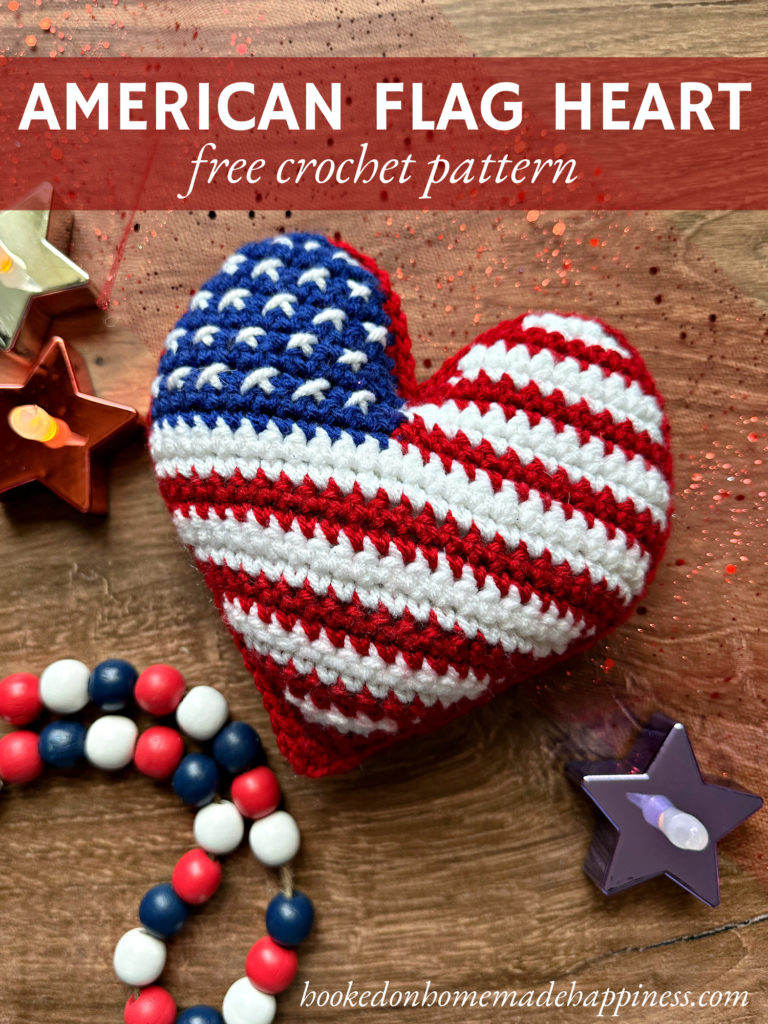
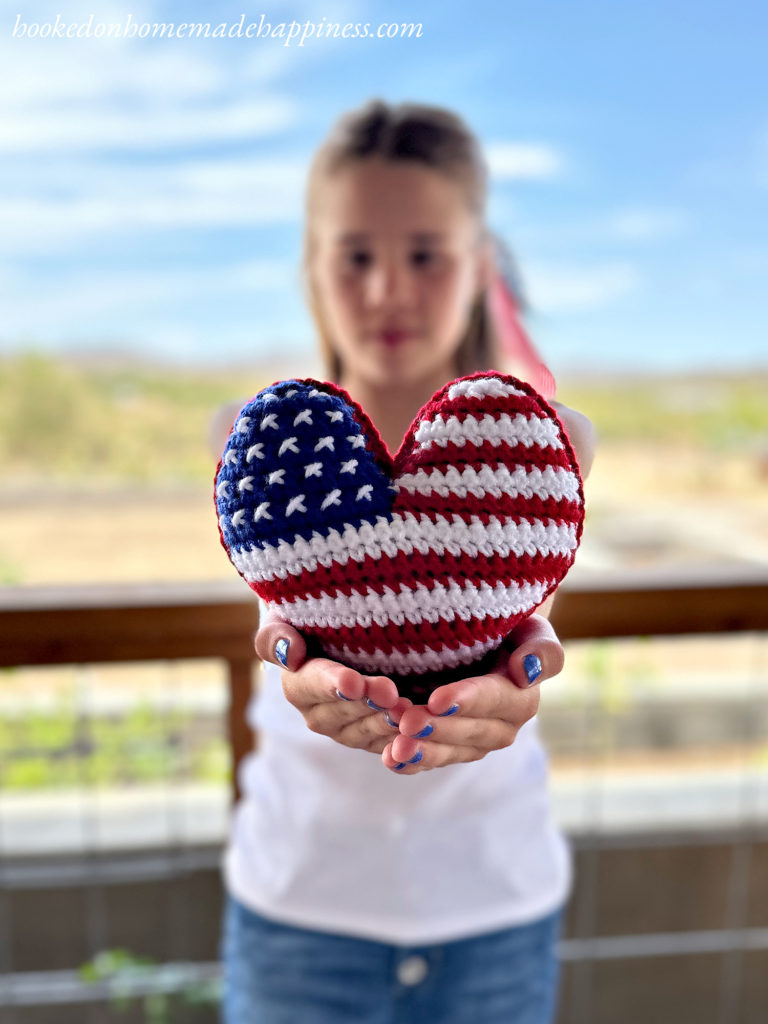
Looking for the perfect patriotic crochet project? This American Flag Heart Crochet Pattern is a charming and festive design that works great as a decorative pillow or a cute amigurumi gift. Whether you’re celebrating the 4th of July, Memorial Day, or simply want to add some red, white, and blue to your home, this crochet heart is a quick and satisfying make.
Pattern Details
This project is made by creating two heart panels and sewing them together. The front panel is styled to look like the American flag—complete with classic red and white stripes and a starry blue corner. The back panel is a simple solid heart for easy finishing.
Once sewn and stuffed, the heart becomes a plump, huggable patriotic pillow or a statement piece for your couch, porch, or celebration display.
What You’ll Need
- Worsted weight yarn in red, white, blue, and a bit of white for the stars
- G/4.0 mm Crochet hook
- Fiberfill stuffing
- Yarn needle
- Optional: safety eyes or embroidery for a kawaii-style face
Skills You’ll Use
- Basic crochet stitches (single crochet, increases, decreases)
- Color changes
- Working in rows
- Sewing pieces together
This pattern is beginner-friendly, with easy shaping and minimal sewing. A great stash-busting project, too!

Ways to Use It
- Decorative pillow for patriotic holidays
- Amigurumi-style gift for a friend or veteran
- Fun addition to your holiday market booth
- Cute photo prop or shelf decoration
click here to pin for later >>>
American Flag Heart Crochet Pattern
PIN for later HERE
Add to your Ravelry Queue HERE
Materials
worsted weight acrylic yarn in red, white, and blue (I used I Love this Yarn)
G/4.0 mm hook
yarn needle
scissors
fiber fill
stitch markers
Level
intermediate
Pattern Notes & Stitches to Know
ch – chain
sl st – slip stitch
sc – single crochet
sc2tog – single crochet 2 together
· written in US terms
· Heart is made with 2 separate pieces sewn together.
· When making the red and white stripes, do not fasten off the colors. Carry the yarn along the side.
· ch 1 does not count as sc
AMERICAN FLAG HEART CROCHET PATTERN
Starting with RED, ch 2
Row 1: sc in 2nd ch from hook (1 sc)
Row 2: ch 1, turn, 2 sc (2 sc)
Change to WHITE
Row 3: ch 1, turn, 2 sc in each stitch (4 sc)
Row 4: ch 1, turn, 2 sc in first stitch, sc in next 2 stitches, 2 sc in last stitch (6 sc)
Change to RED
Row 5: ch 1, turn, 2 sc in first stitch, sc in each stitch across to last stitch, 2 sc in last stitch (8 sc)
Row 6 – 14: repeat row 5 – continue changing colors every 2 rows – each row will increase by 2 stitches (26 sc)
Row 15 – 16: ch 1, turn, sc in each stitch across (26 sc)
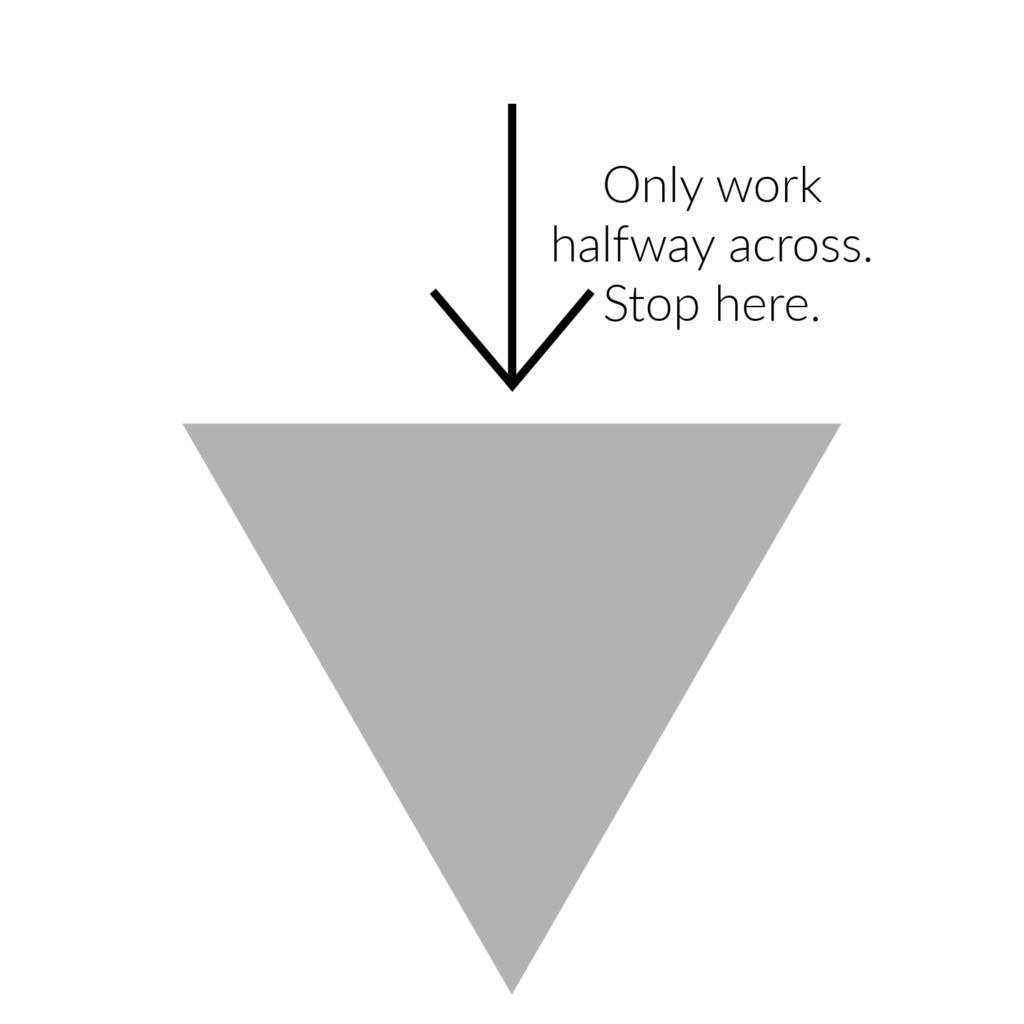
The BLUE section will begin halfway across in the next row
Row 17: ch 1, turn, sc in 13 stitches, change to BLUE, sc in remaining stitches (26 sc)
Continuing with BLUE
Row 18: ch 1, turn, sc in 13 stitches, change to RED, sc in remaining stitches (26 sc)
In the next row, only work halfway across
Change to WHITE
Row 19: ch 1, turn, sc in 13 stitches (13 sc)
Continuing to alternate RED and WHITE every 2 rows
Row 20: ch 1, turn, sc2tog, sc in next 9 stitches, sc2tog (11 sc)
Row 21: ch 1, turn, sc in each stitch across (11 sc)
Row 22: ch 1, turn, sc in 9 stitches, sc2tog (10 sc)
Row 23: ch 1, turn, sc in each stitch across (10 sc)
Row 24: ch 1, turn, sc2tog, sc in next 6 stitches, sc2tog (8 sc)
Row 25: ch 1, turn, sc in each stitches across (8 sc)
Row 26: ch 1, turn, sc2tog across (4 sc)
Row 27: ch 1, turn, sc2tog across (2 sc)
Fasten off.
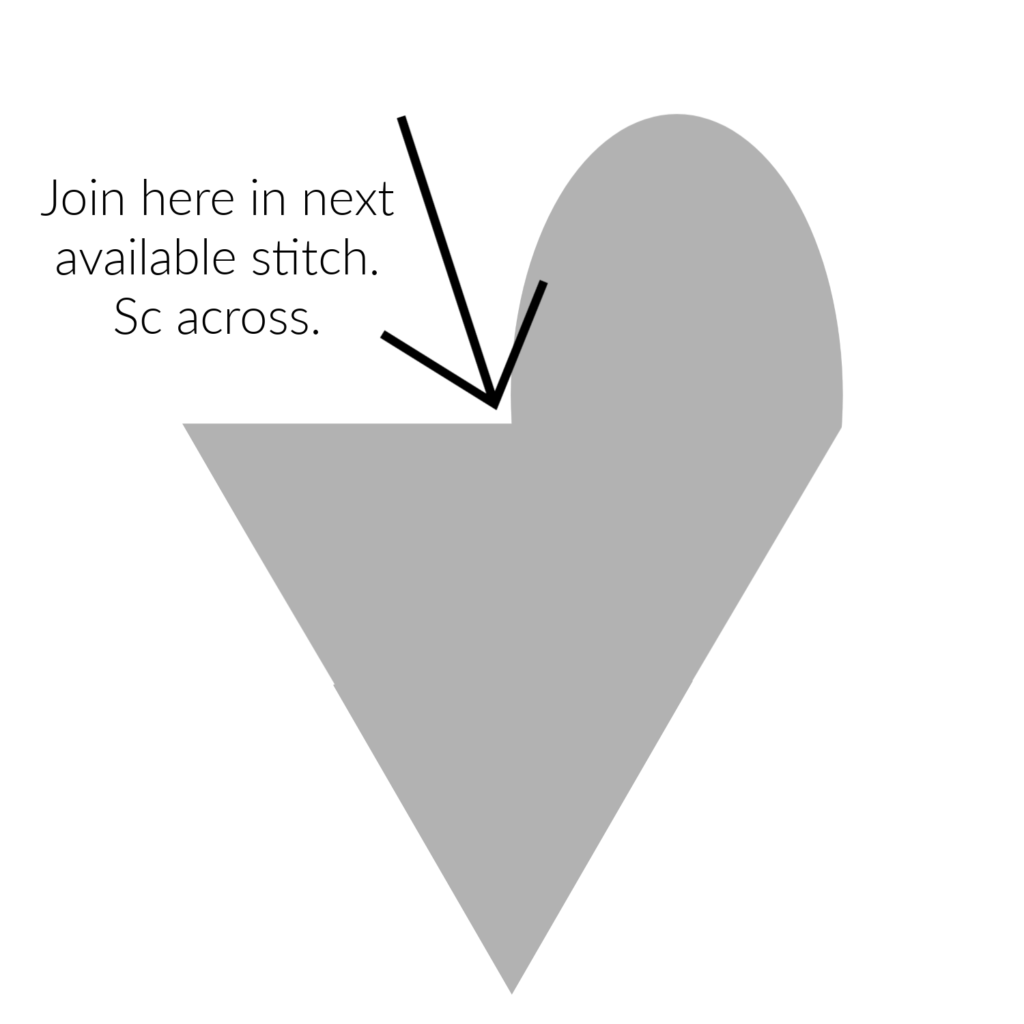
Lay heart with the side just made on the right. Join BLUE yarn in the 13th stitch from the left in Row 19.
Row 19: ch 1, turn, sc in each stitch across (13 sc)
Row 20: ch 1, turn, sc2tog, sc in next 9 stitches, sc2tog (11 sc)
Row 21: ch 1, turn, sc in each stitch across (11 sc)
Row 22: ch 1, turn, sc2tog, sc in remaining stitches (10 sc)
Row 23: ch 1, turn, sc in each stitch across (10 sc)
Row 24: ch 1, turn, sc2tog, sc in next 6 stitches, sc2tog (8 sc)
Row 25: ch 1, turn, sc in each stitches across (8 sc)
Row 26: ch 1, turn, sc2tog across (4 sc)
Row 27: ch 1, turn, sc2tog across (2 sc)
Fasten off.
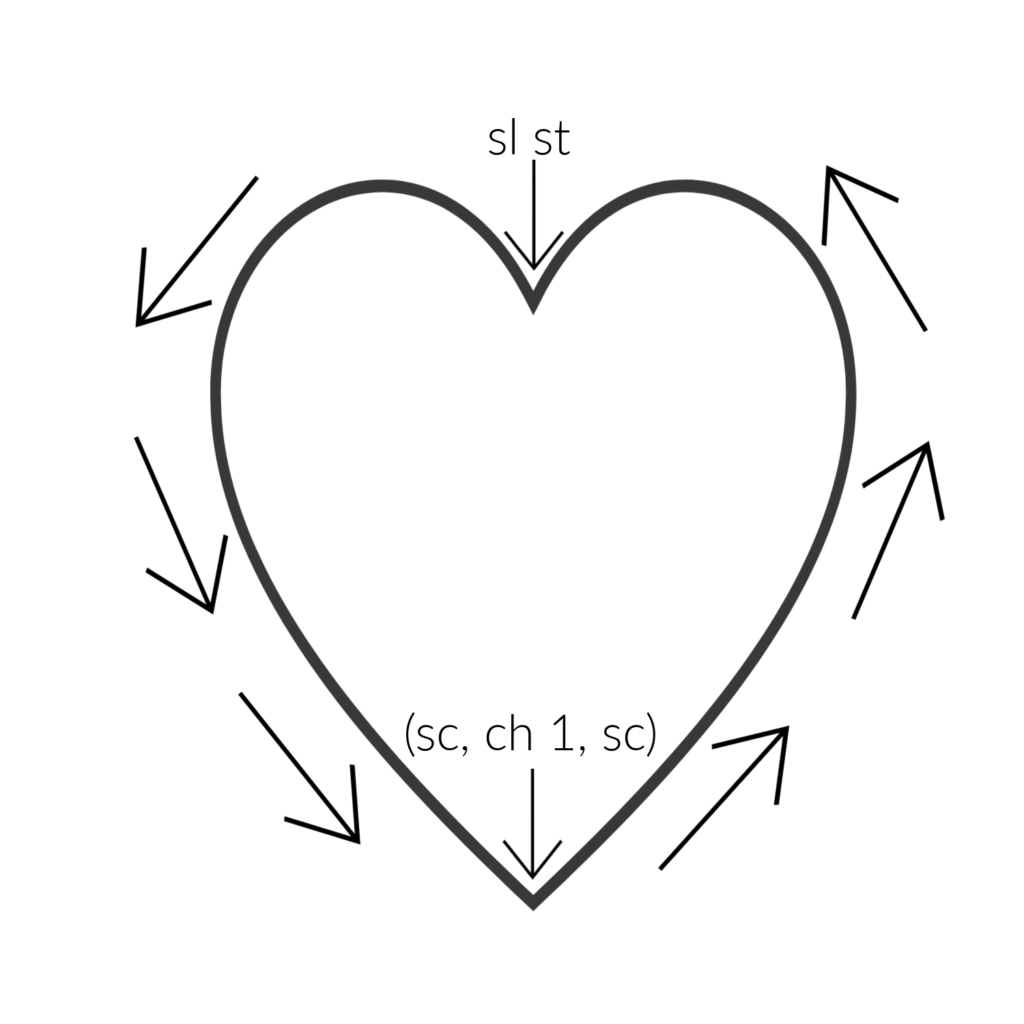
Join RED to last stich made
Ch 1, sc around entire heart. Work down the side, (sc, ch 1, sc) in bottom corner, continue working up the other side and around the curve, sl st in top corner. sc around remaining curve. Join to first sc with sl st. Fasten off. Weave in the ends.
Use white yarn to embroider X’s for the stars on the blue section
Fasten off. Weave in the ends.
Repeat pattern with solid RED
SEWING
Put both hearts together, right side facing out. Use stitch markers to keep them in place. Useing RED sew together using sc around. Join yarn to the ch-1 space in the bottom corner. (sc, ch 1, sc) in ch-1 space, sc in each sc around, sl st in top corner, begin stuffing with fiber fill, sc in remaining stitches around, continue stuffing with fiber fill as it closes up, join to first sc with sl st.
Fasten off. Weave in the ends.
Looking for more patterns? Follow me on Facebook, Instagram, and Pinterest! Please share a pic of your finished product with me. I’d love to see it!


I love this pattern & want to try it but would you be able to give me the measurements of the heart? The length & width.
Thank you so very much in advance for your respond.
Keep crocheting
Marygrace